Guide to Pipettes: Types, Uses, and Proper Pipetting Technique
Learn the main types of pipettes, how micropipettes work, how to choose a volume range, and the correct steps for accurate, contamination-aware pipetting.
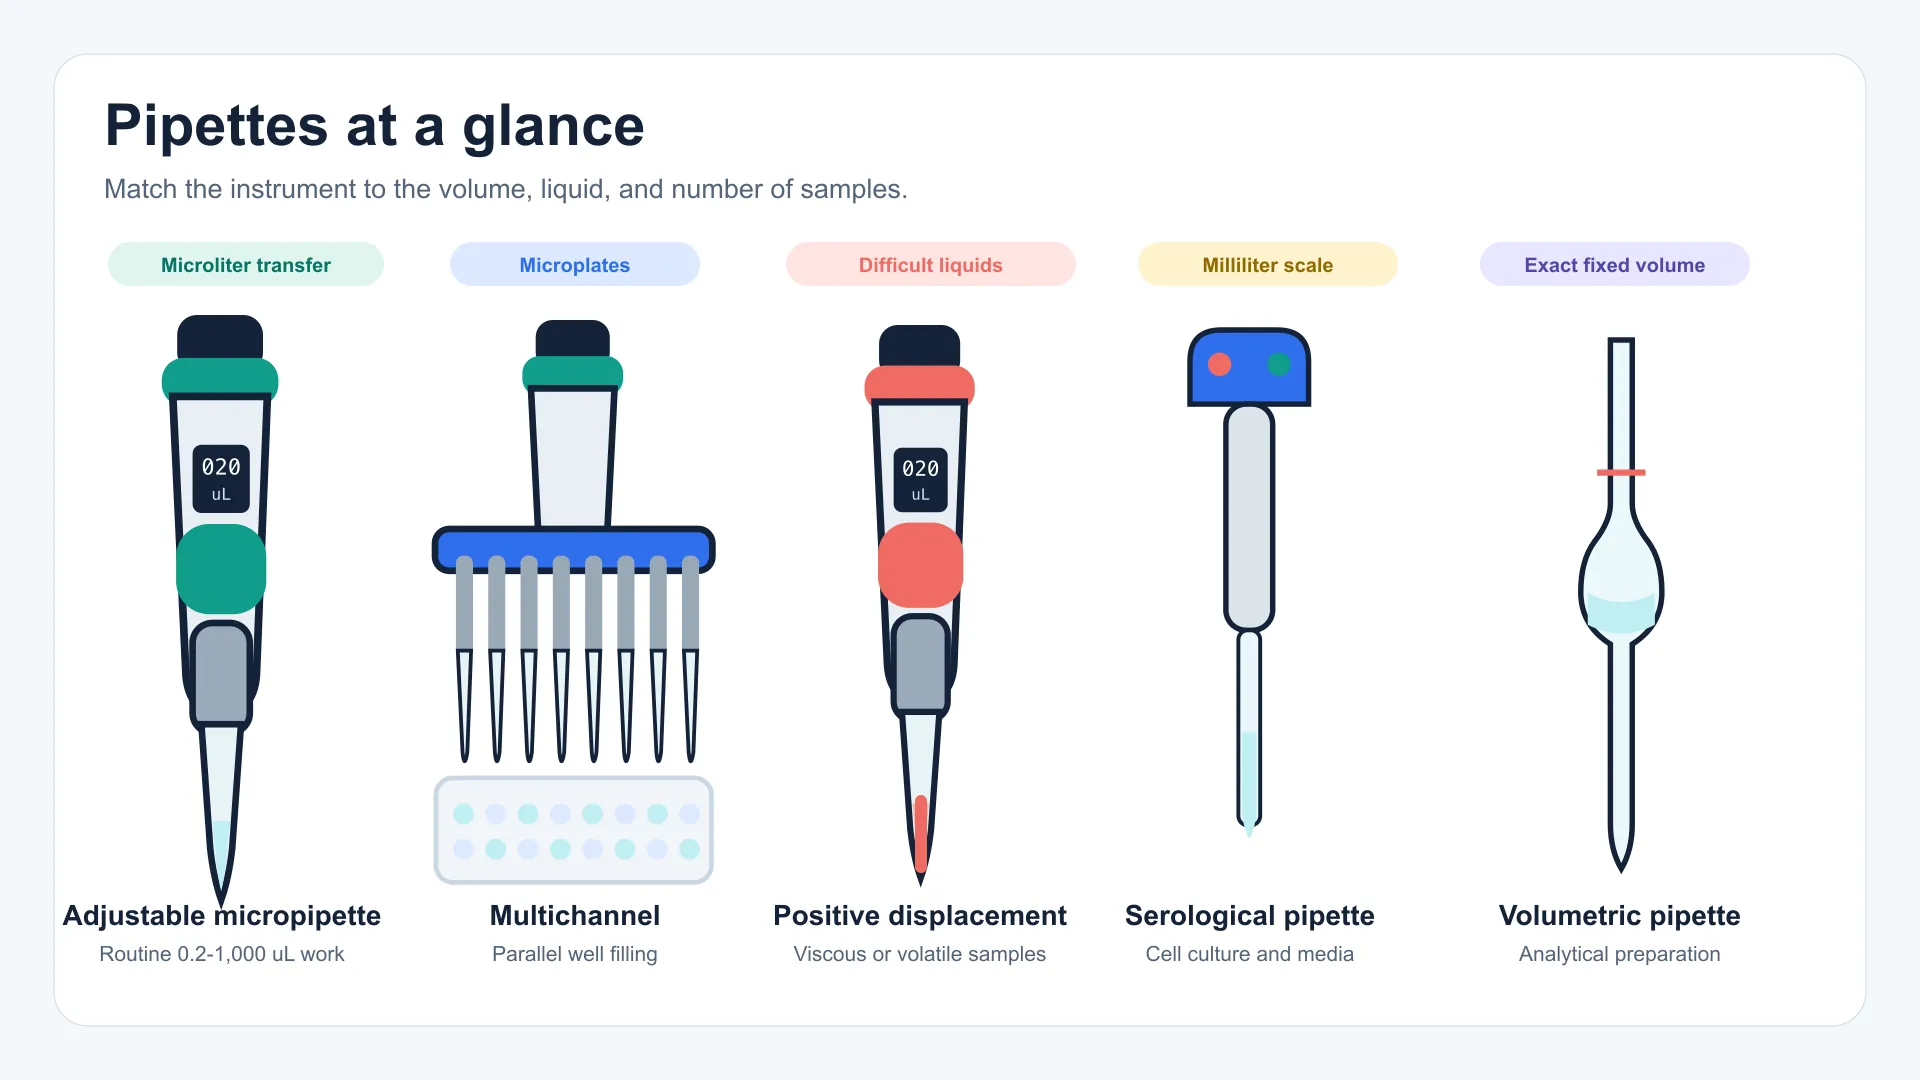
A pipette is a laboratory instrument used to measure and transfer liquid. The best pipette depends on the volume, the liquid's physical properties, the number of samples, and the accuracy the procedure requires. For microliter work, most laboratories use adjustable air-displacement micropipettes. For viscous, volatile, foaming, or very dense liquids, a positive-displacement pipette is often the better choice. Serological, volumetric, graduated, transfer, multichannel, and repeating pipettes each solve a different liquid-handling problem.
This guide is for students, teachers, technicians, and researchers who need a practical introduction to pipette types and correct pipetting technique. It explains what the main pipettes do, how an adjustable micropipette works, how to select a useful volume range, and which habits reduce liquid loss, contamination, and inconsistent results.
Create a Pipette Training Diagram
Turn a lab procedure into a labeled pipette diagram, step-by-step handout, or classroom-ready liquid-handling visual.
Generate a laboratory diagramQuick Reference: Types of Pipettes and Their Uses
The word pipette covers a broad group of tools. Some deliver one fixed volume with high accuracy. Others transfer approximate amounts. Micropipettes use a piston mechanism to handle very small volumes, while glass and plastic pipettes are commonly used for milliliter-scale work.
| Pipette type | Typical use | Volume behavior | Best suited for |
|---|---|---|---|
| Adjustable air-displacement micropipette | Routine microliter liquid transfer | User selects a volume within the marked range | Aqueous buffers, reagents, DNA, RNA, and general molecular biology work |
| Fixed-volume micropipette | Repeating one volume | One factory-set volume | Standardized assays and training where settings should not change |
| Positive-displacement pipette | Difficult liquid transfer | Piston contacts the liquid inside a capillary or special tip | Viscous, volatile, foaming, dense, hot, or cold liquids |
| Multichannel pipette | Filling multiple wells at once | Usually 8, 12, 16, or more channels | Microplates, ELISA, PCR setup, and screening workflows |
| Repeating or stepper pipette | Dispensing many equal aliquots | Aspirates once and dispenses repeatedly | Plate filling, reagent distribution, and long repeat-dispense tasks |
| Serological pipette | Milliliter-scale transfer with a controller | Graduated, usually blow-out | Cell culture media and general sterile liquid handling |
| Volumetric pipette | Preparing or transferring one exact volume | One calibration mark | Analytical chemistry and standard solution preparation |
| Graduated pipette | Measuring several milliliter volumes | Multiple scale marks | General chemistry and teaching laboratories |
| Transfer or Pasteur pipette | Moving liquid without high measurement accuracy | Approximate volume | Adding drops, separating layers, and non-quantitative transfers |
The same name may be used differently across laboratories. For example, some people reserve pipettor for the piston-operated instrument and pipette for the disposable or glass liquid tube. In everyday lab use, pipette commonly refers to both.
How an Air-Displacement Micropipette Works
An air-displacement micropipette has a piston inside the body and a small cushion of air between the piston and the liquid in the disposable tip. Pressing and releasing the plunger changes the air volume. That pressure change draws liquid into the tip or pushes it out.
This design is fast and accurate for routine aqueous samples, but the air cushion is affected by technique and by the liquid's temperature, vapor pressure, viscosity, and density. That is why the same instrument can perform well with water and less predictably with glycerol, ethanol, or a chilled reagent unless the method is adjusted.
Main Parts of a Micropipette
| Part | Function | What to check |
|---|---|---|
| Plunger button | Controls aspiration and dispensing | Movement should be smooth, without sticking |
| First stop | Sets the measured aspiration and primary dispense stroke | Use for the selected volume |
| Second stop or blow-out | Expels remaining liquid from an air-displacement tip | Use at the end of forward pipetting |
| Volume adjustment | Changes the target volume on adjustable models | Never force it beyond the marked range |
| Volume display | Shows the selected volume | Read the digits using the pipette's units and model guide |
| Tip cone | Connects the pipette to a disposable tip | Keep clean and use compatible tips |
| Tip ejector | Removes the used tip without hand contact | Eject into the correct waste container |
| Piston and seal system | Creates controlled displacement | Requires cleaning, inspection, and service when performance changes |
The volume display is not interpreted identically on every model. A display that reads 100 might mean 100 uL on one pipette and 10.0 uL on another. Check the instrument label and manufacturer instructions before use.
How to Choose the Correct Pipette Volume Range
Use the smallest pipette whose specified range comfortably includes the target volume. A 20 uL transfer is generally better handled with a pipette designed around that range than with a 1,000 uL pipette set near its minimum. Working close to the lower limit of a large pipette magnifies the effect of small mechanical and technique errors.
Common nominal ranges include the following, although exact limits vary by manufacturer and model:
| Common pipette class | Example marked range | Typical tasks |
|---|---|---|
| P2 | 0.2-2 uL | Concentrated nucleic acids, enzymes, and very small additions |
| P10 | 0.5-10 uL | PCR reagents, primers, and small assay components |
| P20 | 2-20 uL | Routine molecular biology and analytical samples |
| P100 | 10-100 uL | Master mixes, standards, and tube-to-tube transfers |
| P200 | 20-200 uL | General laboratory transfers and microplate work |
| P1000 | 100-1,000 uL | Buffers, media, and milliliter-scale preparation |
Do not assume the model name defines the exact lower limit. Read the range printed on the actual instrument. Also match the disposable tip to the pipette, target volume, sterility requirement, and contamination risk.
How to Use a Micropipette Correctly
The following workflow describes forward pipetting with a standard air-displacement micropipette. It is the default technique for many water-like liquids.
- Choose the pipette and tip. Confirm that the target volume falls within the pipette's marked range and that the tip is compatible.
- Set the volume. Adjust smoothly without forcing the dial past its limits. If the procedure is sensitive, confirm the units and setting with a second person or checklist.
- Attach a new tip. Seat the pipette firmly enough to make a seal, but avoid repeated hammering into the rack.
- Pre-wet the tip. Aspirate and dispense the sample two or three times when the method or liquid benefits from conditioning the air space and inner tip surface.
- Press to the first stop before entering the liquid. Do not press to the second stop before aspiration during forward pipetting.
- Immerse the tip only a few millimeters. Hold the pipette close to vertical and follow the manufacturer's immersion-depth guidance for the volume and tip size.
- Release the plunger slowly and consistently. Let it return under thumb control, pause briefly after aspiration, and avoid snapping it upward.
- Withdraw carefully. Move the tip out without touching contaminated surfaces. For some vessels, lightly touching the tip to the inner wall helps remove an exterior droplet.
- Dispense against the receiving vessel wall. Press smoothly to the first stop, pause, then continue to the second stop to blow out the remaining liquid.
- Withdraw while the plunger remains depressed. Move the tip away from the wall, let the plunger return, and eject the tip into suitable waste.
Consistency matters as much as any single step. If one operator aspirates vertically and slowly while another tilts the pipette, immerses the tip deeply, and releases the plunger quickly, the two may obtain different results even with the same instrument.

Forward pipetting is most repeatable when angle, immersion depth, plunger speed, and timing stay consistent across every transfer.
Forward vs Reverse Pipetting
Forward and reverse pipetting use the same plunger stops in different sequences.
| Technique | Aspiration | Dispensing | Good choice for |
|---|---|---|---|
| Forward pipetting | Press to first stop, immerse, then release | First stop followed by second-stop blow-out | Most water-like solutions |
| Reverse pipetting | Press to second stop, immerse, then release | Dispense only to first stop; discard the residual liquid in the tip | Viscous, foaming, or some volatile liquids |
| Repetitive dispensing | Aspirate a larger volume once | Deliver several controlled aliquots | Reagent distribution and plate filling |
Reverse pipetting intentionally leaves a small residual volume in the tip. That residue is not returned to the source container because doing so can contaminate the stock. The technique can improve delivery consistency for liquids that cling to the tip, form bubbles, or do not behave like water.
For highly challenging samples, reverse pipetting may still be insufficient. A positive-displacement pipette removes the air cushion and uses a piston that directly displaces the liquid within a capillary-style tip. This makes it less sensitive to vapor pressure and viscosity.
Pipetting Different Kinds of Liquids
Aqueous, Water-Like Solutions
Use forward pipetting, a compatible standard tip, smooth plunger movement, and consistent immersion depth. Pre-wetting is especially useful when small errors matter.
Viscous Liquids
Glycerol-rich buffers, oils, and concentrated protein solutions move slowly and may remain on the tip wall. Aspirate and dispense more slowly, pause longer, and consider reverse pipetting, wide-bore tips, or positive displacement. Avoid cutting tips by hand unless the laboratory has validated that practice, because irregular openings create inconsistent flow and contamination risk.
Volatile Liquids
Solvents with high vapor pressure can expand the air cushion and cause dripping or volume error. Work efficiently, pre-condition the tip when appropriate, and use reverse or positive-displacement pipetting according to the method and instrument instructions. Follow the chemical's safety data sheet and use suitable ventilation and protective equipment.
Foaming Liquids
Do not churn the sample with rapid aspiration and dispensing. Use slow strokes, minimize bubbles, and consider reverse pipetting or positive displacement.
Hot or Cold Liquids
Large temperature differences between the pipette, tip, room, and sample can change air-cushion behavior. When the protocol allows, equilibrate the equipment and liquid. If temperature is part of the experiment, standardize timing and handling instead of improvising between samples.
Accuracy, Precision, and Common Pipetting Errors
Accuracy describes how close a delivered volume is to the intended value. Precision describes how closely repeated deliveries agree with one another. A pipette can be precise but inaccurate if it repeatedly delivers the same wrong amount. It can also average near the correct value while individual transfers vary too much.
| Problem | Likely cause | Practical correction |
|---|---|---|
| Low delivered volume | Tip leak, fast aspiration, shallow immersion, liquid retained in tip, or damaged seal | Replace the tip, slow down, inspect the cone and seals, and repeat a performance check |
| High delivered volume | Tip immersed too deeply, liquid on the outside of the tip, or incorrect setting | Use consistent shallow immersion, wipe only when the validated method permits, and verify the display |
| Bubbles in the tip | Plunger released too quickly, tip near the liquid surface, or foaming sample | Re-aspirate slowly with correct immersion depth or change technique |
| Dripping tip | Poor tip fit, damaged seal, volatile liquid, or instrument contamination | Fit a compatible tip, inspect the pipette, and consider positive displacement |
| Variable replicates | Inconsistent angle, timing, plunger speed, tip contact, or temperature | Standardize the operator workflow and train with a visual checklist |
| Cross-contamination | Reused tips, contact with vessel walls, aerosols, or contaminated tip cone | Change tips, use filter tips where appropriate, and clean according to the hazard |
Filter tips can reduce aerosol transfer into the pipette, but they do not replace correct technique, decontamination, or hazard-specific controls. Use sterile tips when the procedure requires sterility, and never assume that a filter tip makes a non-sterile workflow sterile.
Calibration, Performance Checks, and Maintenance
Pipettes are measuring instruments. Their performance should be checked on a schedule appropriate to the laboratory's risk, workload, quality system, and manufacturer recommendations. The ISO 8655-2 standard for piston pipettes defines metrological requirements and test considerations for this instrument class.
Routine care includes:
- Store pipettes upright on a stand when that is the manufacturer's recommendation.
- Do not lay a pipette down while liquid is inside the tip.
- Clean the exterior and tip cone with materials compatible with the instrument and contaminant.
- Inspect seals, pistons, ejectors, and cones when performance changes.
- Use only cleaning, lubrication, autoclaving, and disassembly procedures approved for the specific model.
- Record service, calibration, repair, and failed performance checks.
- Remove a pipette from critical use if it is dropped, damaged, leaking, or producing unexplained results.
Gravimetric performance testing commonly determines delivered volume by weighing water under controlled conditions and converting mass to volume with appropriate corrections. Critical laboratories should follow their quality system and use qualified service or calibration procedures rather than treating a casual balance check as formal calibration.
Pipetting Ergonomics and Safe Work Habits
High-throughput pipetting can strain the thumb, wrist, shoulder, and neck. Keep frequently used tubes and plates within easy reach, work at a suitable bench height, keep the wrist neutral, and alternate tasks when possible. Electronic pipettes, light plunger forces, multichannel instruments, and repeating dispensers can reduce repetitive motion when they fit the procedure.
Liquid handling also has chemical and biological risks. Wear the protective equipment required by the protocol, use the correct containment, and dispose of tips according to the sample hazard. Review the laboratory safety symbols guide when building student or staff training materials.

A neutral wrist, short reach, suitable PPE, fresh tips, and dedicated tip waste make repeated liquid handling safer and more consistent.
How to Create a Pipette Training Diagram
A strong pipette diagram should show an action sequence, not just a picture of the instrument. Use separate panels for setup, aspiration, dispensing, and tip disposal. Show the plunger stops clearly, keep the tip and liquid level large enough to read, and add short labels outside the illustration rather than crowding the instrument.
Useful Figviz prompts include:
Create a four-panel laboratory training diagram showing forward pipetting with an adjustable micropipette: attach a clean tip, press to the first stop and aspirate vertically, dispense against the tube wall through the second stop, then eject the used tip. Clean textbook style, white background, concise labels.Create a comparison diagram of air-displacement and positive-displacement pipettes. Show the air cushion in the standard micropipette and the piston contacting liquid in the capillary tip. Add a decision note for aqueous versus viscous or volatile liquids. Publication-ready scientific illustration.For a student worksheet, request one labeled version and one blank version with numbered callouts. The Science Drawing Generator is the closest fit for laboratory equipment, while the AI Scientific Image Generator is useful for research methods and experimental apparatus. The microscope parts guide shows how to organize another lab instrument into names, functions, safe-use steps, and worksheet prompts.

A useful pipette training diagram connects the controls and internal mechanism to what happens inside the disposable tip.
Sources and Further Reading
This guide was checked against the scope of ISO 8655-2:2022 for piston pipettes, the liquid-handling instrument categories published by Eppendorf, and the pipette and tip resources from Thermo Fisher Scientific. Exact operating steps, compatible tips, calibration limits, cleaning agents, and service procedures vary by model, so the instrument manual and the laboratory's validated method take priority. The article was also reviewed against Google's guidance on creating helpful, reliable, people-first content.
FAQ
What is a pipette used for?
A pipette is used to measure and transfer liquid. Different designs handle different jobs, from approximate drop transfer and milliliter-scale cell culture work to accurate microliter dispensing for molecular biology and analytical assays.
What is the most common type of pipette in a biology lab?
The adjustable air-displacement micropipette is the most common choice for routine microliter work with water-like buffers and reagents. Laboratories usually keep several pipette sizes so each target volume falls comfortably inside an instrument's working range.
How do you choose the correct micropipette size?
Choose the smallest pipette whose marked range includes the target volume without operating outside its limits. Check the range printed on the actual model, because pipettes with similar names can have different minimum volumes.
What is the difference between the first and second stop?
The first stop controls the measured piston stroke used for aspiration and the primary dispense. The second stop is the blow-out position used to expel liquid that remains in the tip during forward pipetting.
When should you use reverse pipetting?
Reverse pipetting is useful for viscous, foaming, and some volatile liquids. The operator aspirates with the larger second-stop stroke, dispenses only to the first stop, and discards the small residual volume left in the tip.
Why should a pipette be held vertically during aspiration?
A near-vertical aspiration angle helps keep immersion depth and hydrostatic pressure consistent. Tilting an air-displacement pipette changes the liquid column and can contribute to volume variation, especially at small volumes.
How often should pipettes be calibrated?
There is no single interval for every laboratory. The schedule should reflect usage, risk, quality requirements, manufacturer guidance, and performance history. A pipette should also be checked after a drop, repair, leak, or unexplained change in results.
Can Figviz create a pipette diagram or lab training handout?
Yes. Use the Science Drawing Generator and describe the pipette type, liquid-handling sequence, labels, audience, and output format. You can request a labeled guide, a blank worksheet, a forward-versus-reverse comparison, or a step-by-step training poster.
Build a Clear Pipetting Guide for Your Lab or Class
Use Figviz to turn a written liquid-handling method into a labeled diagram, training slide, or printable worksheet. Start with the Science Drawing Generator, then compare the output with the real pipette model, its manual, and your laboratory procedure before using it for training or experimental work. For broader figure planning, see the guide to illustrating scientific methods and the scientific diagrams for research papers guide.
Author


